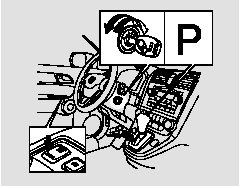
Honda CR-V: Auto Door Unlocking
The auto door unlocking feature has five possible settings:
The auto door unlocking is deactivated all the time.
The driver’s door unlocks when you move the shift lever to the Park (P) position with the brake pedal depressed.
This is the default setting.
All doors and tailgate unlock when you move the shift lever to the Park (P) position with the brake pedal depressed.
The driver’s door unlocks whenever you turn the ignition switch to the ACCESSORY (I) position.
All doors and tailgate unlock whenever you turn the ignition switch to the ACCESSORY (I) position.
To turn off the Auto Door Unlock modes:

1. Make sure the shift lever is in the Park (P) position.
2. Turn the ignition switch to the ON (II) position, and open the driver’s door.
3. Push and hold the rear of the master door lock switch on the driver’s door. You will hear a click, and after about 5 seconds, you will hear another click.
4. Release the switch, and within 20 seconds, turn the ignition switch to the LOCK (0) position.
To program the Park Unlock mode:
Unlocks the driver’s door or all doors and tailgate when the shift lever is moved into the Park (P) position with the brake pedal depressed.

1. Make sure the shift lever is in the Park (P) position.
2. Turn the ignition switch to the ON (II) position, and make sure to close the driver’s door.
3. Push and hold the rear of the master door lock switch on the driver’s door. You will hear a click.
Continue to hold down the switch:
Until you hear another click (after about 5 seconds) to activate driver’s door unlock feature.
Or, until you hear two more clicks (after about 10 seconds) to activate all doors and tailgate unlock feature.
4. Release the switch, and within 20 seconds, turn the ignition switch to the LOCK (0) position.
To program the Ignition Switch Unlock mode:
Unlocks the driver’s door or all doors and tailgate when the ignition switch is moved out of the ON (II) position.

1. Make sure the shift lever is in the Park (P) position.
2. Turn the ignition switch to the ON (II) position, and make sure to close the driver’s door.
3. Push and hold the brake pedal, then move the shift lever out of the Park (P) position.
4. Push and hold the rear of the master door lock switch on the driver’s door. You will hear a click.
Continue to hold down the switch:
Until you hear another click after about 5 seconds) to activate driver’s door unlock feature.
Or, until you hear two more clicks (after about 10 seconds) to activate all doors and tailgate unlock feature.
5. Release the switch, and within 20 seconds, turn the ignition switch to the ACCESSORY (I) position.
Move the shift lever to the Park (P) position.
6. Turn the ignition switch to the LOCK (0) position.

