Honda CR-V: Consoles
Center Console Removal/Installation
Special Tools Required
KTC trim tool set SOJATP2014 *
* Available through the American Honda Tool and Equipment Program; call 888-424-6857
SRS components are located in this area. Review the SRS component locations and the precautions and procedures before doing repairs or service.
NOTE:
- Put on gloves to protect your hands.
- Use the appropriate tool from the KTC trim tool set to avoid damage when prying components.
- Take care not to scratch the front seat, dashboard, and related parts.
1. Slide the seat fully to the rear to access the front console trim.
2. From the front portion of the center console, detach the clips (A) by pulling out the front console trim (B) with a trim tool.
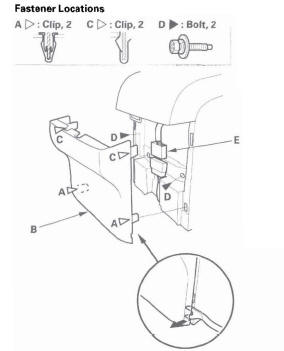
3. Detach the clips (C), then remove the front console trim. From the front portion of the center console, remove the bolts (D) and disconnect the subharness connector (E), and detach the harness clip.
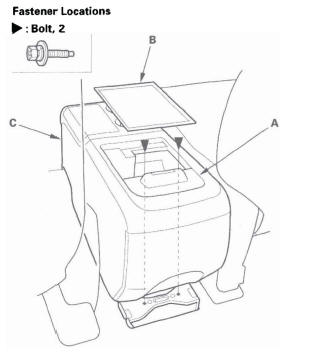
4. Open the shutter (A), then remove the console box mat (B) and bolts. Lift up the center console (C) and remove it.
5. Install the center console in the reverse order of removal, and note these items:
- Make sure the connector is plugged in properly.
- Push the clips and hooks into place securely.
- Check if the clips are damaged or stress-whitened, and if necessary, replace them with new ones.
Center Console Disassembly/Reassembly
Special Tools Required
KTC trim tool set SOJATP2014 *
* Available through the American Honda Tool and Equipment Program; call 888-424-6857
NOTE:
- Put on gloves to protect your hands.
- Use the appropriate tool from the KTC trim tool set to avoid damage when prying components.
- Take care not to scratch the front seat, dashboard, and related parts.
1. Remove the center console.
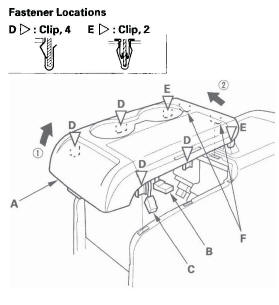
2. Remove the center console upper panel (A).
- Disconnect the console accessory power socket connector (B) and the auxiliary jack assembly connector (C).
- Gently pull the front portion of the center console upper panel up, and remove the clips (D).
- Pull the rear portion of the center console upper panel up, remove the clips (E), and release the hooks (F).
3. From the center console upper panel, remove the screws, then remove the CD box (A) and inner lid (B) or pocket.

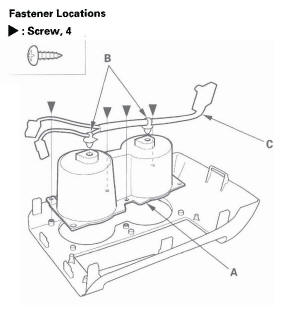
4. Remove the screws, then remove the cup holder (A). Detach the harness clips (B), and remove the console subharness (C) from the cup holder.
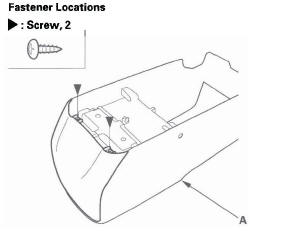
5. From the bottom of the center console (A), remove the screws.
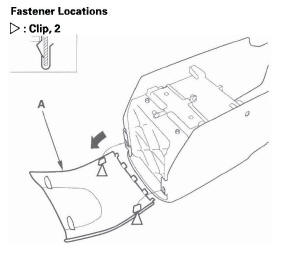
6. Gently pull out the center console rear cover (A) to detach the clips.
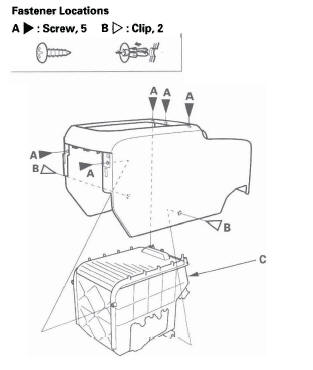
7. Remove the screws (A) and clips (B), then remove the console box (C).
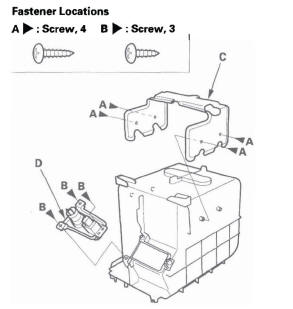
8. Remove the screws (A, B), then remove the bracket (C) and jack panel (D).
9. Reassembly the center console in the reverse order of disassembly, and note these items:
- Make sure all connectors are plugged in properly.
- Push the clips and hooks into place securely.
- Check if the clips are damaged or stress-whitened, and if necessary, replace them with new ones.
READ NEXT:
 Center Upper Dashboard Panel
Removal/Installation
Center Upper Dashboard Panel
Removal/Installation
Special Tools Required
KTC trim tool set SOJATP2014 *
* Available through the American Honda Tool and
Equipment Program; call 888-424-6857
NOTE:
Put on gloves to protect your hands.
Use the appropr
Driver's Vent Panel Removal/Installation
Special Tools Required
KTC trim tool set SOJATP2014 *
* Available through the American Honda Tool and
Equipment Program; call 888-424-6857
NOTE:
Put on gloves to protect your hands.
Use the appropr
SEE MORE:
Differential Reassembly
Exploded View
Special Tools Required
Holder handle 07JAB-001020A
Companion flange holder 07RAB-TB4010B
1. Apply differential fluid to the rubber pinion of the
ATF strainer (A), then install the ATF strainer, the
magnet (B), the dowel pins (C), and the oil pump
pin (D), in the differential carri
DTC 32-8x ("x" can be 0 thru 9 or A thru F):
Short to Power in Front Passenger's Side
Airbag Inflator
Special Tools Required
SRS inflator simulator 07SAZ-TB4011A
SRS simulator lead L 070AZ-SNAA300
NOTE: Before doing this troubleshooting procedure,
review SRS Precautions and Procedures.
1. Erase the DTC memory.
2. Turn the ignition switch ON (II), and check that the
SRS indicator comes on for a
