Honda CR-V: Fuel Pump Circuit Troubleshooting
If you suspect a problem with the fuel pump, check that the fuel pump actually runs; when it is on, you will hear some noise if you listen to the fuel fill port with the fuel f ill cap removed. The fuel pump should run for 2 seconds when the ignition switch is first turned on. If the fuel pump does not make noise, check as follows:
1. Turn the ignition switch OFF.
2. Remove the under-dash fuse/relay box, then remove PGM-FI main relay 2 (FUEL PUMP) (A) from the under-dash fuse/relay box.

3. Reinstall the under-dash fuse/relay box.
4. Turn the ignition switch ON (II).
5. Measure voltage between PGM-FI main relay 2 (FUEL PUMP) 4P connector terminal No. 3 and body ground.

Is there battery voltage? YES-Go to step 13.
NO-Go to step 6.
6. Turn the ignition switch OFF.
7. Disconnect under-hood fuse/relay box connector D (8P).
8. Jump the SCS line with the HDS.
9. Disconnect PCM connector A (44P).
10. Disconnect under-dash fuse/relay box connector G (21P).
11. Connect under-dash fuse/relay box connector G (21 P) terminal No.4 to body ground with a jumper wire.

12. Check for continuity between under-hood fuse/ relay box connector D (8P) terminal No. 6 and body ground.

Is there continuity?
YES-
- Replace PGM-FI main relay 1.
- If needed, replace the under-hood fuse/relay box.
NO-Repair open in the wire between the under-hood fuse/relay box and the under-dash fuse/relay box.
13. Measure voltage between PGM-FI main relay 2 (FUEL PUMP) 4P connector terminal No.1 and body ground.

Is there battery voltage? YES-Go to step 14.
NO-
- Check the No.2 FUEL PUMP (15 A) fuse in the under-dash fuse/relay box.
- If needed, replace the under-dash fuse/relay box.
14. Turn the ignition switch OFF.
15. Connect PGM-FI main relay 2 (FUEL PUMP) 4P connector terminal No.4 to body ground with a jumper wire.

16. Jump the SCS line with the HDS.
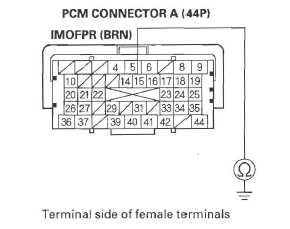
17. Disconnect PCM connector A (44P).
18. Check for continuity between body ground and PCM connector terminal A 15.

Is there continuity? YES-Go to step 19.
NO-Repair open in the wire between PGM-FI main relay 2 (FUEL PUMP) and the PCM (A 15).
19. Remove the under-dash fuse/relay box. then reinstall PGM-FI main relay 2 (FUEL PUMP).
20. Reinstall the under-dash fuse/relay box.
21. Connect PCM connector terminal A6 to body ground with a jumper wire.

22. Turn the ignition switch ON (II).
23. Measure voltage between PCM connector terminal A15 and body ground.

Is there battery voltage? YES-Go to step 24.
NO-Replace PGM-FI main relay 2 (FUEL PUMP).
24. Turn the ignition switch OFF.
25. Reconnect PCM connector A (44P).
26. Turn the ignition switch ON (II), and measure voltage between under-dash fuse/relay box connector F (34P) terminal No. 10 and body ground within 2 seconds.

Is there battery voltage? YES-Update the PCM if it does not have the latest software, or substitute a known-good PCM, then recheck. If the symptom/indication goes away with a known-good PCM, replace the original PCM.
NO-Go to step 27.
27. Turn the ignition switch ON (II), and measure voltage between under-dash fuse/relay box connector F (34P) terminal No. 10 and body ground after 2 seconds.

Is there battery voltage? YES-Go to step 28.
NO-If needed, replace the under-dash fuse/relay box, then go to step 28.
28. Turn the ignition switch OFF.
29. Fold the left side rear seat forward, and pull back the carpet to expose the access panel.
30. Remove the access panel from the floor.
31. Turn the ignition switch ON (II), and measure voltage between fuel tank unit 4P connector terminal No.2 and body ground within 2 seconds.

Is there battery voltage? YES-Go to step 36.
NO-Go to step 32.
32. Turn the ignition switch OFF.
33. Remove PGM-FI main relay 2 (FUEL PUMP).
34. Connect PGM-FI main relay 2 (FUEL PUMP) 4P connector terminals No.1 and No.2 with a jumper wire.

35. Turn the ignition switch ON (II), and measure voltage between fuel tank unit 4P connector terminal No.2 and body ground within 2 seconds.

Is there battery voltage? YES-Replace PGM-FI main relay 2 (FUEL PUMP).
NO-Repair open in the wire between PGM-FI main relay 2 (FUEL PUMP) and the fuel tank unit 4P connector.
36. Turn the ignition switch OFF.
37. Check for continuity between fuel tank unit 4P connector terminal No.4 and body ground.

Is there continuity? YES-Replace the fuel pump.
NO-Repair open in the wire between the fuel tank unit 4P connector and G602.

