Honda CR-V: APP Sensor Signal Inspection
Honda CR-V (2006–2011) Service Manual / Fuel and Emissions / Electronic Throttle Control System / APP Sensor Signal Inspection
NOTE:
- This procedure checks the APP sensor in its fully closed position. In any other position, the APP sensor stores DTCs which are covered in other troubleshooting procedures.
- Check for Temporary DTCs or DTCs with the HDS before doing this procedure. If any DTCs are indicated, troubleshoot them first, then do this procedure.
- Press the accelerator pedal several times to check its operation. If it does not operate smoothly, check the pedal. If you find a problem, replace the accelerator pedal module.
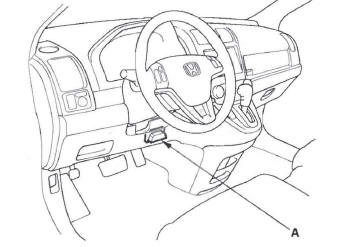
1. Connect the HDS to the data link connector (DLC) (A) located under the driver's side of the dashboard.
2. Turn the ignition switch ON (II).
3. Make sure the accelerator pedal is not pressed, then check the APP SENSOR in the DATA LIST with the HDS.
- If it is 0 %, the APP sensor is OK.
- If it is not 0 %, update the PCM if it does not have the latest software, or substitute a known-good PCM, then go to step 4.
4. Make sure the accelerator pedal is not pressed, then check the APP SENSOR in the DATA LIST with the HDS.
- If it is 0 %, the APP sensor is OK.
- If it is not 0 %, replace the accelerator pedal module, then go to step 1.
Accelerator Pedal Module Removal/Installation
1. Disconnect the accelerator pedal module connector (A).
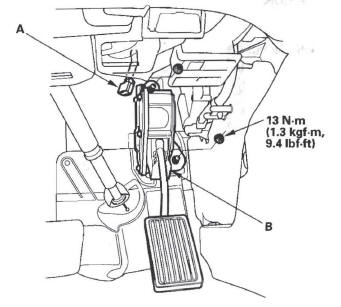
2. Remove the accelerator pedal module (B).
NOTE: The APP sensor is not available separately.
Do not disassemble the accelerator pedal module.
3. Install the parts in the reverse order of removal.
READ NEXT:
 VTEC/VTC
Component Location Index
ROCKER ARM OIL CONTROL VALVE
Removal/Installation
ROCKER ARM OIL PRESSURE SWITCH
Removal/Installation
CAMSHAFT POSITION (CMP)
DTC P0010: VTC Oil Control Solenoid Valve
Malfunction
NOTE: Before you troubleshoot, record all freeze data and any on-board
snapshot, and review the general troubleshooting information.
1. Turn the ignition switch ON (II).
2. Clear the DTC with the H
SEE MORE:
DTC 21-1x ("x" can be 0 thru 9 or A thru F):
Open or Increased Resistance in Driver's Seat
Belt Tensioner
DTC 21-1x ("x" can be 0 thru 9 or A thru F):
Open or Increased Resistance in Driver's Seat
Belt Tensioner
Special Tools Required
SRS inflator simulator 07SAZ-TB4011A
SRS simulator lead K 070AZ-SNAA200
NOTE: Before doing this troubleshooting procedure,
review SRS Precautions and Proce
Bluetooth Wireless Technology
The Bluetooth name and logos are
registered trademarks owned by
Bluetooth SIG, Inc. and any use of
such marks by Honda Motor Co.,
Ltd. is under license. Other
trademarks and trade names are
those of their respective owners.
As required by the FCC:
This device complies with Part 15 of t
© 2016-2025 Copyright www.hcrv.net
