Honda CR-V: Steering
Honda CR-V (2006–2011) Service Manual / Steering
Special Tools
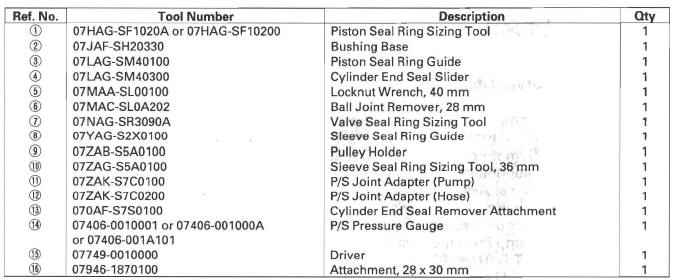
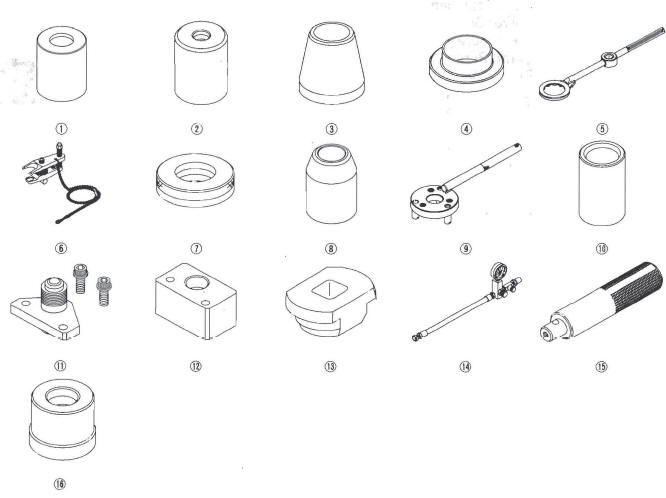
- Piston Seal Ring Sizing Tool
- Bushing Base
- Piston Seal Ring Guide
- Cylinder End Seal Slide
- Locknut Wrench, 40 mm
- Ball Joint Remover, 28 mm
- Valve Seal Ring Sizing Tool
- Sleeve Seal Ring Guide
- Pulley Holder
- Sleeve Seal Ring Sizing Tool, 36 mm
- P/S Joint Adapter (pump)
- P/S Joint Adapter (Hose)
- Cylinder End Seal Remover Attachment
- P/S Pressure Gauge
- Driver
- Attachment, 28 x 30 mm
Component Location Index
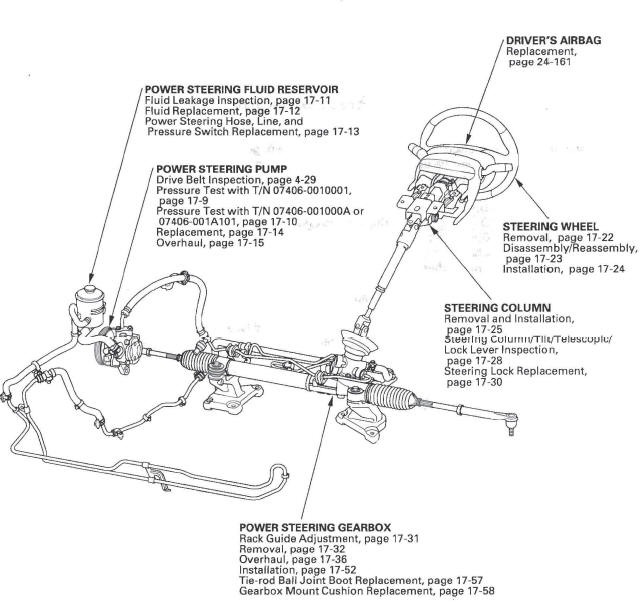
- POWER STEERING FLUID RESERVOIR
- Fluid Leakage Inspection
- Fluid Replacement
- Power Steering Hose, Line, and Pressure Switch Replacement
- POWER STEERING PUMP
- Drive Belt Inspection
- Pressure Test with T/N 07406-0010001
- Pressure Test with T/N 07406-001000A or 07406-001A101
- Replacement
- Overhaul
- DRIVER'S AIRBAG
- Replacement
- STEERING WHEEL
- Removal
- Disassembly/Reassembly
- Installation
- STEERING COLUMN
- Removal and Installation
- Steering Column/Tilt/Telescopic/Lock Lever Inspection
- Steering Lock Replacement
- POWER STEERING GEARBOX
- Rack Guide Adjustment
- Removal
- Overhaul
- Installation
- Tie-rod Ball Joint Boot Replacement
- Gearbox Mount Cushion Replacement
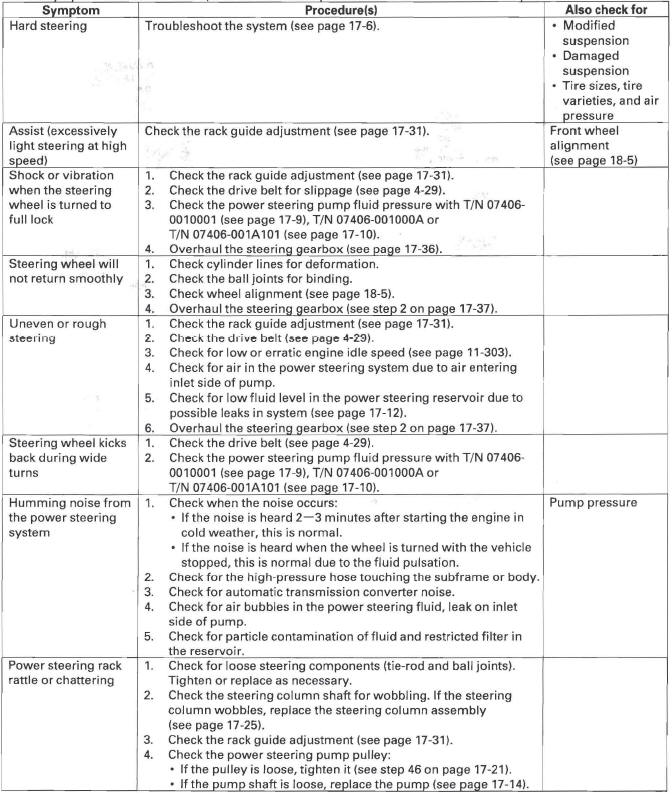
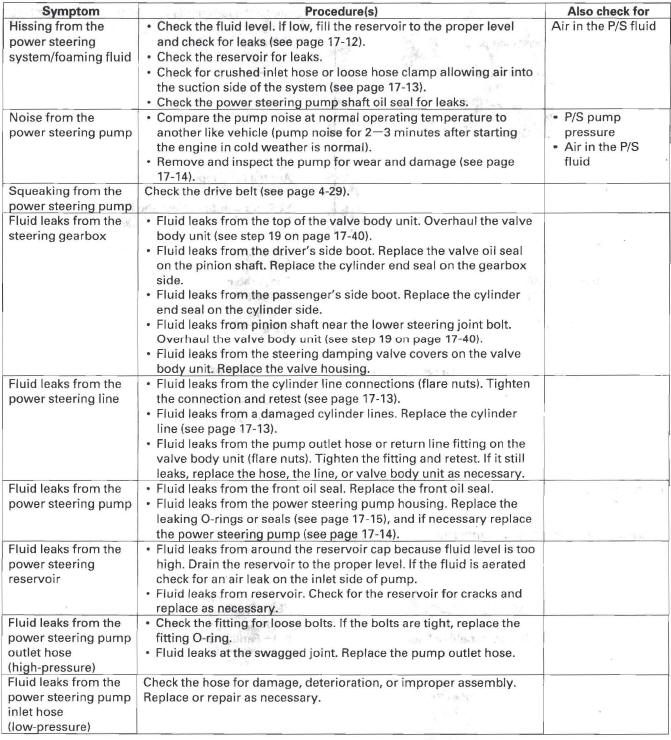
Symptom Troubleshooting Index
Find the symptom in the chart below, and do the related procedures in the order listed until you find the cause.
READ NEXT:
 Symptom Troubleshooting
Hard Steering
1. Check the power assist.
Is the initial turning load more than 34 N (3.5 kgf,
7.7 Ibf) ?
YES-Go to step 2.
NO-Power assist is OK.
2. Connect the P/S joint adapter (pump), P/S joint
Pump Pressure Test
Pump Pressure Test with T/N 07406-0010001
Special Tools Required
P/S joint adapter (pump) 07ZAK-S7C0100
P/S joint adapter (hose) 07ZAK-S7C0200
P/S pressure gauge 07406-0010001
Check the fluid pre
Pump
Pump Replacement
1. Place a suitable container under the vehicle.
2. Drain the power steering fluid from the reservoir.
3. Remove the drive belt (A) from the pump pulley.
4. Cover the auto-tensione
SEE MORE:
Dual Pump System Function Test
Starting and accelerating in forward gears
(4WD mode)
NOTE: Do not test repeatedly or the fluid will overheat.
1. Lift up the vehicle so all four wheels are off the ground.
2. Make a mark (A) on either No.1 or No.2 propeller
shaft (B).
3. Start the engine, and let it run until it warms up (the
ra
DTC P0706: Open in Transmission Range
Switch Circuit
NOTE:
Before you troubleshoot, record all freeze data and any on-board
snapshot, and review General Troubleshooting Information.
This code is caused by an electrical circuit problem
and cannot be caused by a mechanical problem in the
transmission.
1. Clear the DTC with the HDS.
2. 4WD model
© 2016-2025 Copyright www.hcrv.net
