Honda CR-V: Hood
Hood Adjustment
1. Remove these items:
- Front bulkhead cover
- Front fender trim
- Cowl cover
2. Slightly loosen each bolt (A).
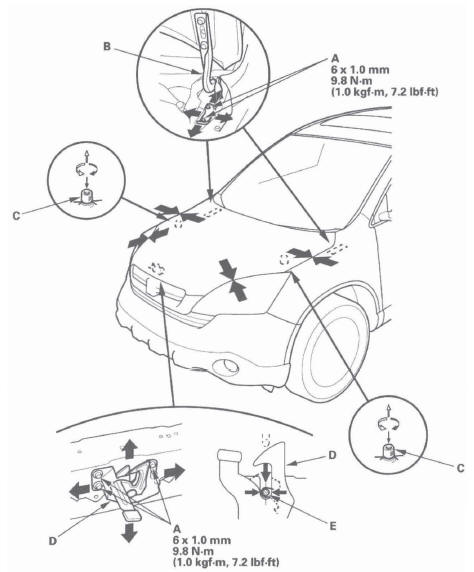
3. Adjust the hood alignment in this sequence:
- Adjust the hood right and left, as well as forward and rearward, by using the elongated holes in the hood hinges (B).
- Turn the hood edge cushions (C), as necessary, to make the hood fit flush with the body at the front and side edges.
4. Adjust the hood latch (D) to obtain the proper height at the forward edge, and move the hood latch right or left until the striker (E) is centered in the hood latch.
5. Tighten the bolts to the specified torque.
6. Check that the hood opens properly and closes securely.
7. Apply touch-up paint to the hinge mounting bolts and around the hinges, and let the paint dry.
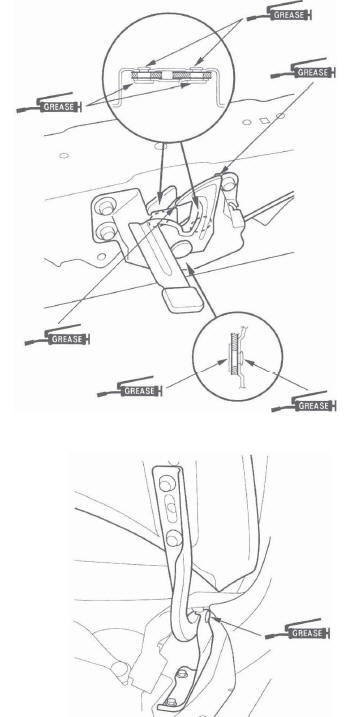
8. Apply multipurpose grease to the hood latch and hood hinges as indicated by the arrows.
9. Reinstall all of the removed parts.
Hood Seal Replacement
1. Using a clip remover, detach the clips (A, B), then remove the hood seals (C, D). Take care not to scratch the hood.
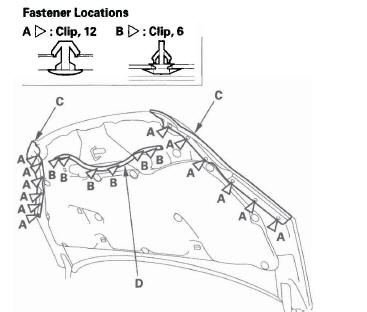
2. Install the seals in the reverse order of removal, and note these items:
- Check if the clips are damaged or stress-whitened, and if necessary, replace them with new ones.
- Push the clips into place securely.
Hood Insulator Replacement
1. Using a clip remover, detach the clips. Release the hooks (A), then remove the hood insulator (B). Take care not to scratch the hood.
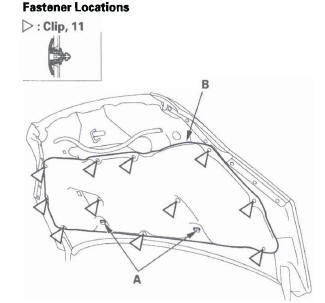
2. Install the insulator in the reverse order of removal, and note these items:
- Check if the clips are damaged or stress-whitened, and if necessary, replace them with new ones.
- Push the clips and hooks into place securely.
READ NEXT:
 Tailgate
Tailgate Adjustment
NOTE:
Have an assistant help you when adjusting the
tailgate.
Take care not to scratch the tailgate, body, and other
related parts.
Put on gloves to protect your hands.
1. R
Fuel Fill Door
Fuel Fill Door Adjustment
1. Remove the nut (A), then remove the open spring
(B).
2. Slightly loosen the hinge mounting bolts (A).
3. Adjust the fuel fill door (B) in or out until it's flush
with th
SEE MORE:
Memorizing the Tire Pressure Sensor ID
Special Tools Required
TPMS sensor initializer tool AKS0620006
Available through the American Honda Tool and
Equipment program, 888-424-6857.
All four tire pressure sensor IDs must be memorized to
the TPMS control unit whenever you do any of these
actions:
Replace the TPMS control unit.
Replace
Pre-Tow Checklist
When preparing to tow, and before
driving away, be sure to check the
following:
The vehicle has been properly
serviced, and the suspension and
the cooling system are in good
operating condition.
The trailer has been properly
serviced and is in good condition.
All weights and loads are
